
 |
| Click the picture above to be directed to the app on iTunes. |
Here are some simple tips for using this handy app:
Add a Roster
Create a new class, tap "More" and then "Type or Paste Names." Type or paste your student names (one per line) in either the "First Last" format or "Last, First." You can also copy them from an online roster and paste them into the text box in the same format. Select "Done" when finished.
*If you need to delete a student, select "More" in the bottom right corner, then "Roster," swipe left across their name, and select "Delete." To add new students select the plus (+) sign.
Add Photos to Students

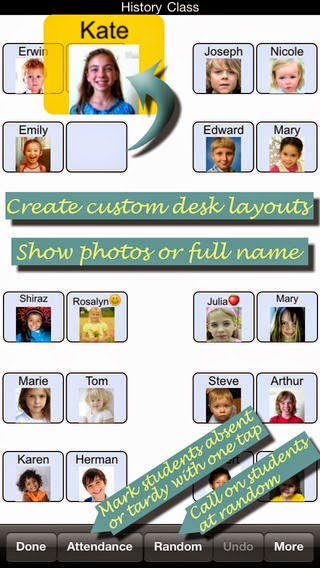
From the seating chart or from the roster, select a student, and choose "Album" to find a picture saved in your camera roll or "Camera" to take a photo of your student right then. You can also reposition or enlarge the photo if needed. If you would like the photos to show on your seating chart, select "More," "Chart Options," and turn on "Include Photos."
Make Notes about Students
From the seating chart or from the roster, select a student, select "Notes," and type any important notes about your students. You might want to add notes about student behavior, performance, participation, accommodations, modifications, allergies, and any other important information. From the Student Info page, you can also add a nickname and view attendance. This information can also be emailed to parents, colleagues, the counselor, diagnostician, principal, or even yourself by selecting "Export" and entering an email address.
Customize Desk Layout
Select "More" in the bottom right corner, then "Change Layout," and pan left, right, down or up to change the number of desks. Then, touch the the desks to remove them. To add a desk back, tap the empty space again. Select "Done" when finished. To move a student's desk, select and hold down on their name/image and drag them to another desk. You can also move all students to new desks by selecting "More" and "Scramble Students."
View or Email PDF Chart

To print or email your seating chart to substitutes or administrators, select "More" in the bottom right corner, then "Chart Options, and select to email or view the chart under the "Export" heading. If you would like to include photos of your students in the printed chart, select "Include Photos" under the "Export Settings" heading. Here you can also select to reverse the perspective, include the student's last name, change the page orientation, or show student groups. To print the seating chart, after you select "View PDF Chart," select the "share" arrow in the top right corner, then choose "Print," select a wifi-printer, and tap "Print."
Take Attendance

To take attendance, select "Attendance" at the bottom of the seating chart screen. You can select "All Pres" if all students are present, or select students individually and mark them Absent, Tardy, or Excused. Select "Done" when finished.
View Attendance Summary

Select "More" in the bottom right corner, then "Attendance Summary," select a start and end date, then view or email the report. This will make it easy to transcribe your class' attendance in your school's attendance system later.
Create Groups

Select "More" in the bottom right corner, then "Create Groups." Choose the number of groups by selecting the plus (+) or minus (-) sign in the top left corner, tap "Create," then "Done." Students will be randomly assigned to groups, which are designated by different colors.
Randomly Select Students
To randomly call on students during a lesson or class discussion, select "Random" at the bottom of the seating chart, then the "Next" button to select a student. Once a student's name appears, it won't reappear until all students have been called on.
If you have any questions on how to use the app, please feel free to comment below or email us at watsonworks1@outlook.com.
~Heather & Ashley
Watson Works

No comments:
Post a Comment